Poser – the program (1 Introduction)

In the end, Poser is just another piece of software. It interacts with memory, processing power, file system and even the network. Use it wisely.

Download this tutorial in PDF format (1.4 Mb)

Poser – the program

At the bottom line Poser is just a piece of software, with an inside and an outside.
At the inside you’ll find all the features that the Missing Manuals will tell you about (in other articles), at the outside it consumes CPU power, RAM space, loads and stores its files and interacts with you following the software settings.
This article discusses this outside part of the program, as far as the interaction with Windows is concerned. I’m not familiar with Apple, sorry for that, but perhaps some tips and tricks are generic enough.

I’ll kick off with considering Installation, including issues that might disrupt the working of the program in general.
Once I’m up and running I might face program crashes when my scene gets too large and complicated. That’s a memory issue, so I’ll discuss Ram Usage next. Once I’ve survived on that, I will notice that some renders take a considerable amount of time. No sweat, my machine is multi-tasking so I might do something else in the meantime.
Hence, CPU Usage is the third topic. I’ll end this first, basic part with some miscellaneous topics (File Usage, including the Library and Poser Settings) on the interaction between Poser and the file system, and with you or me: the user.

The second part focuses on working more efficiently. Rendering Strategies discusses rendering in background and using the Queue Manager (both for Poser Pro 2010+ only), enabling me to work on one Poser scene while rendering another. Rendering Performance discusses the workflow itself. A lot of time is wasted with unnecessary test-renders and with doing the right things in the wrong order, over and over again. And finally Professional Considerations presents a peek in the real kitchen. Pro users meet schedules, deadlines and budgets because they don’t do in 3D what can be done in 2D.

For those who want or need to tweak or reset Posers behavior via the backdoor: the Appendix reveals the details of the Poser.ini file.

Poser – the program (2 Installation)

Installation

When Poser comes out the box, it has to be installed first. Always install into a fresh folder, never install over already existing Poser software. In Windows this will put the software in a new Program Files subfolder which is fine. When Poser Pro installs on a 64-bit Windows, it does so in Program Files (the 64-bit software) as well as on Program Files (x86) for the 32-bit software – that is: when I tick the box to do so. In all cases, I can define another installation path.
As a bonus, I can keep on using my previous Poser release, they happily coexist.

The point is: Windows takes some serious effort to protect those Program Files folders against additions and modifications by users and user programs, like Poser and scripts, as these adjustments are a main source of errors, bugs and threads. For neatly created software, Windows offers an alternative for those additions found in the hidden (user)\AppData\Roaming folder which offers additional features for those working in a networked setup, and for data backup. This folder also houses program essentials like Poser.ini, LibraryPrefs.xml and so on.
However, for Library data, projects, scene details and for scripts storing their settings in local files, Program Files is the place not to be.

Therefore, the next step: Select Content Location should be considered with care.

  • Shared Documents – will put the contents (is: Library data) on the C:\ drive visible over the network (when sharing folders is enabled), and available to other users on the same machine. This is the default.
  • My Documents – will put the content on the C:\ drive but not visible over the network, and neither available to other people using the same machine (and logged in with a different account). This makes sense when I want to protect the integrity of my content against other users, like in college environments.
  • Poser Directory – will put the content in the same folder as the software. Although this was the default (or even only option) for older versions of Poser, this is definitely the option not to choose as already discussed above.
  • Other Location – will put the content somewhere else, like another hard drive or so. This enables me to use C:\ for programs and D:\ for data, or something alike.

More on software installation

Just a few side notes on the installation.

  1. When installing older versions of Poser, please note that these might (and need to!) install the Library content in the same folder as the program files. At the same time, this Poser version might not be able yet to deal with the Windows protection schemes that came with Vista and up. For those reasons it might be advised to install these older Poser versions outside the Program Files, in a folder of your own. 
  2. The main Poser software might be installed on multiple computers and can be used by multiple persons, but only as one instance at a time, “like a book”. Site licenses allowing for multiple simultaneous use can be obtained separately.
    In order to render on multiple machines, Poser is not needed as only the Poser Pro Queue Manager can be installed on multiple machines to support rendering over the network. 
  3. When installing the Poser Pro software, just installing Queue Manager only is one of the selectable options. 
  4. Even when Poser will not look for new versions of the software itself, and when it won’t access the Internet, it still needs the proper firewall permissions. Grant them. They are used for communications between several software components. Various 3rd party software like the P3dO library manager also uses internal networking to communicate with the Poser program.
  5. Poser needs the Library to function properly, which requires either Adobe Air (preferred) or Flash being available. They come on the installation CD but not with the download version.
    The issue with Flash is that some systems tend to become unstable when multiple instances of it are active simultaneously. This might happen when opening Poser Library, Google Chrome (Flash embedded) , Internet Explorer (explicit Flash plugin) and more of those at the same time.
    Poser will detect Air by itself, but just in case: the Poser.ini file (in the hidden (user)\AppData\Roaming\… folder) contains a line LIBRARY_IS_AIR 1, where 1: Adobe Air, and 0: Flash 
  6. The main source of Poser failures is the video card, its drivers, and its handling of OpenGL. Symptoms are: crashes and freezes at startup, and at random moments even when working on small scenes and not rendering yet. In most cases updating the drivers resolves the situation.
    While using an outdated video card with no new drivers available, switching the preview from OpenGL to SreeD might solve the issue at least for a while. SreeD is quite limited compared to OpenGL but it paints the preview entirely within the application, not using any advanced video card features.
    Also note that large texture images require sufficient video memory, and might cause problems when that resource falls short. The various options for setting the video card behavior can be found in
    • The Display menu
    • Right clicking the preview pane
    • The Preview tab in menu Render \ Render Settings…
  7. Other sources of trouble are the already mentioned use of Flash (related to the Library), running out of memory (when rendering larger scenes) or facing large render times or an unresponsive PC (while rendering). The two latter issues are addressed in chapters later in this article.
    If nothing works, try the magic of deleting the LibraryPrefs.xml but make a copy of it if there are external runtimes installed. Poser creates a new one but only with the standard runtime plus downloads. Same to deleting the Poser.ini: a new one with just the default values will be recreated at Poser startup.
    The appendix to this article contains an annotated list of the Poser.ini settings.

More on content installation

Poser requires all content to be available in a Runtime folder which is part of any <base folder> of my choice. I can have as many <base folders> as I like, which are referred to as “external runtimes”.

In the old days (and perhaps still, with the older versions of Poser as well), one Runtime folder was present in the Poser program directory. This “internal Runtime” hosted all standard library content that came with the package. Next to it, the program folder hosted a Downloads folder as well, for all my other content. The basic thought was that a new version of Poser came with its own internal Runtime, and I only had to transplant my Downloads in order to continue.

Nowadays the Downloads folder has gone (*), and all content is supposed to reside in external Runtimes. At install time I just create my first one, or when I’m upgrading: I just create a new one next to my existing ones. Personally I disadvise against installing the content from the package into existing runtimes, or over one from a previous version. I can however add the previous runtime as an extra library to the new set of libraries.

(*) more accurate: the <base folder> created at installation contains a filled Runtime, a Documentation folder with the manuals, and a Downloads folder which contains an empty Runtime. After installation, the Library refers to this Runtime as well as this Download folders, everything else had to be added into it again.
The program folder still contains a Runtime subfolder, which is used to host plugins, standard scripts etc. but is not meant to contain scene-building components for library content.

More on the Library can be found in the File Usage chapter.

Installing scripts

The standard catalogue of scripts can be extended by myself, or by 3rd party ones. Actually the scripts can be stored anywhere, and opened using the File \ Run Python Script menu option. Some scripts however prefer to be launched from the internal Runtime, within the Poser program folder.
Scripts which are stored in the internal Runtime, ..\Python\PoserScripts\ScriptsMenu folder are displayed in the programs Scripts menu, which can be quite handy.

Placing scripts in the Poser program folder, when hosted in Program Files, might trigger a warning since Windows is protecting the environment. Well, I know what I’m doing, so I just go through the routine. For the same reason, Windows will prevent the scripts to write themselves in that area. Modern, Windows Vista and up – proof scripts, might not have a problem and put their settings files in the proper place. But … other scripts might run into problems. Then I have a choice: I put the script somewhere else and have a more elaborate way launching it, or I really move Poser itself to another base folder outside Program Files.

Poser – the program (3 RAM Usage)

RAM Usage

The Poser program comes in two varieties: the 32bit and the 64bit one. Poser Pro and all “just Poser” versions are available in 32bit only; only Poser Pro 2010 and up present both varieties . The 64bit variety will install and function in a 64bit Windows only, the 32bit varieties will work in a 32bit as well as a 64bit Windows system.

All 32bit software can handle 2Gb of “user memory” by default, or can be made “Large Address Aware” (or: LAA-enabled) to handle more. All Poser software has that ability already and needs no further adjustment.

32bit operating systems will grant 2Gb user memory to programs, or can be told to grant more. The upper limit is 3Gb. Mac OSX and Linux have this ability enabled by default and hence will grant more than 2Gb to a LAA-enabled program that asks for it. But 32bit Windows requires some additional settings. If those are not set, Poser can use up to 2Gb user memory only. If set, Poser can use more, up to the limit set in Windows, with a max of 3Gb.

On how to set the 3GB-switch in Windows, and how to enable LAA in programs that come without, I wrote the Breaking the 2Gb Barrier TUTORIAL.

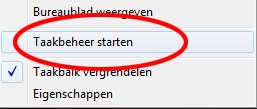
How can I find out the user memory usage of my program? Well, I just right-click on the taskbar at the bottom of my screen, select: Task Manager:

Then I select the Processes tab, and select my program of interest from the list. It reports CPU usage and User memory

In the example above, Poser Pro is not busy (00 % processor) and uses 150.868kB (say 150Mb) user memory.

Note that not all of this memory is required in RAM. Windows can decide to put some portion of it on disk (virtual memory) and swap it back in when requested. Also note that this is just the “user memory” portion, the total amount of memory required by Poser also includes space for code, internal tables and system interfacing. But I can’t affect the latter, so I don’t have to worry about it.

How much memory do I need?

  • 150Mb for the empty program, just launched and no scene nor figures loaded.
  • 150Mb for an average scene. It can be less, with just a single background object. Or far more when I’ve loaded a large scale extremely detailed castle environment with loads of high resolution textures.
  • 100Mb for a character (like Vicky 4) including textures and a decent set of morphs, without clothing
  • 100 – 200Mb for clothing of that one character
  • And then rendering requires an additional 2- (average) to 4-fold (peak) of the amount needed for scene, characters and clothing.

For example:

  • I start Poser, delete the default Andy figure (makes an empty scene of 150Mb), and just load Vicky with some morphs (100Mb) and a decent clothing set (150Mb) for a total of 150+100+150 = 400 Mb. Then I render, and Vicky + clothes (250Mb together) goes fourfold, or: adds 1000Mb. Hence at the peak of the rendering process, my total user memory requirements are 1400Mb. During the render, the average memory usage is 900Mb.
  • Now I add Mike (+clothes) to the scene, which adds another 250Mb to the design stage. But he also adds 500Mb on the average to the rendering. On the average. Because when the rendering peaks on either Vicky or Mike the memory requirements will be 1400+500=1900Mb in each peak, and when the renderer cannot prevent peak overlap the requirement might be as extreme as 1400+1000=2400Mb.
  • As I might (or just might not) cross the 2Gb boundary while doing this, my rendering might crash on a normal 32bit Windows machine. I can save my ass by raising the bar by setting the “3Gb switch”.
  • Adding some scenery or a third character will definitely overload the rendering on any 32bit machine. Unless I go for reduced resolution characters, clothes and textures, and/or for reduced quality rendering (eg: turn displacement maps off, etc.).

A special way out is: render as a separate process.

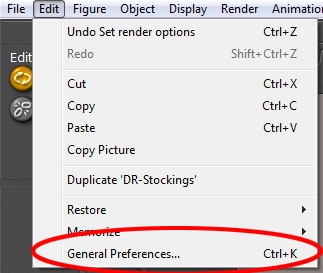
This magic requires an adjustment of the Poser settings themselves. Select General Preferences in the Edit menu, of click Ctrl+K:


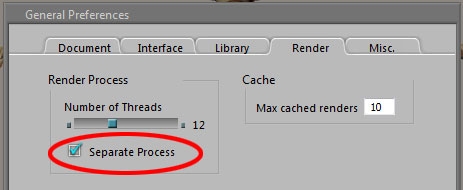
Then I select the Render tab, check the Separate Process option and click [OK]. I do not have to restart Poser, and I might switch it off later.

When I render now, TaskManager shows an extra process: FFRender (the FireFly Renderer).

As one can see in the example above, Poser itself stands still (CPU 00%) while holding the program, one character and clothing for about 410Mb, while the FFRender is doing the work (85% CPU usage) while also using the memory for rendering only (you’re seeing the Vicky 4 rendering peak at about 1000Mb). This does save some memory, and enables me to put more figures or scene detail in while still remaining under the 2Gb or 3Gb limit, as far as the 32bit version of software is concerned (yes, FFRender is LAA-enabled too).

It’s not faster (actually, launching a separate process and reeling its results back in takes a bit extra), it doesn’t save on total systems memory consumption (as the Poser process is still around taking up the extras) and while it’s running I still cannot use Poser for other work simultaneously. But it’s leaner on memory for that specific process which can save the day. And sometimes it seems to cure other things as well, for whatever reason. So when the scene appears prone to crashing at render time, Separate Process is the first way to go. As is observing the programs behavior in TaskManager: do watch the memory consumption for that process.

And… you do save your scenes before rendering, do you? Just in case.

Actually, forking out to a separate process never hurts. Even now, working in a 64bit environment, I’ve got Separate Process switched on and leave it that way.
On top of that, one might benefit from a “hidden feature” when running a 32-bit Poser version in a 64-bit environment. That is; even the 32-bit versions may come (*) with FFRender64.exe which gives us the all 64-bit capabilities while rendering: somewhat faster and no memory hogs. But one has to set “render in separate process” to benefit from it.
Poser itself knows which FFRender to use, but you can tell it yourself by altering the Poser.ini settings (ALLOW_FFRENDER64 1).
(*) I found this in the 32-bit Poser Pro 2010+ program folders, perhaps it comes with Poser itself too. Don’t know.

Poser – the program (4 CPU Usage)

CPU Usage

While designing a scene, Poser might be high on memory requirements but stays rather low on processing power. Let alone some exceptions Poser is a single thread process, while most modern machines can handle numerous threads simultaneously. Even for laptops and office desktops, two is a minimum nowadays. Only rendering kills the available CPU capacity, as Poser tends to use all available resources to the max.

This can be annoying when the rendering takes a long time (to whatever standard) and one wants to use the machine for other tasks as well. Then the machine turns out te be quite unresponsive. From making a slow mouse response or seriously disturbing game or video playback to loosing connection to other machines or the net thanks to missing response deadlines, it’s plain annoying.

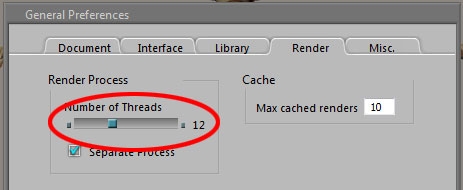
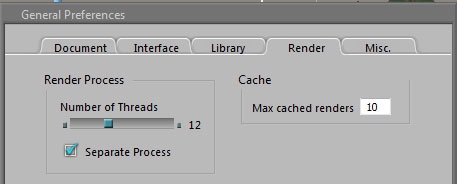
One approach people take is to reduce the load from the Poser settings. Again, they’re in the General Settings, Render tab


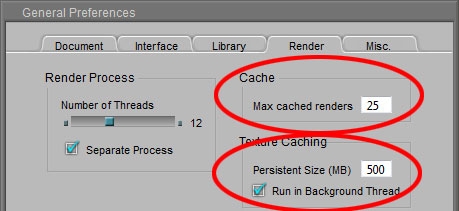
and by default Poser wants to utilize all available threads. In my case, as shown above, that’s 12 (as I’ve got an Intel 990X 6-core hyperthreading CPU in the box).

I can reduce it to 11, 10 or what I want, reducing the max CPU load and freeing some capacity for other use. And of course I can increase the number even up to 32, although issuing more threads than can be simultaneously processed will not give any speed increase. The problem with this method however is, that it’s rude, unnecessary and above all: cannot be adjusted at runtime. One has to make the right guess before clicking the render button, and the setting lasts at least as long as the render. The non-assigned capacity is then available to the other processes in the machine.

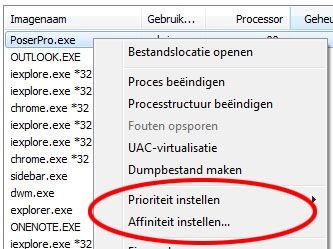
More gentle as well as flexible methods can be found in the operating system (Windows, I’m not that familiar with Apple, sorry). We’ll find them in TaskManager, Processes tab when right-clicking the process at hand:

They are called: Assign Priority, and Assign Affinity.


Assign Affinity

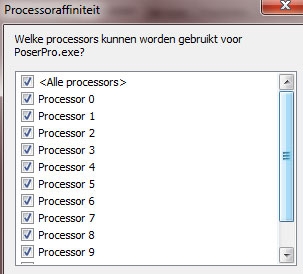
When I click this option I’ll get a list of available processors (=threads, see image):

As can be expected in my 6-core hyperthreaded machine, the twelve processes are numbered 0 to 11. I can tick them on/off, and after [OK] I’ve got less or more CPU capacity available for that process. Essentially this is just a variety on adjusting the Poser setting as discussed above. With one major difference: this Affinity can be adjusted at runtime, up as well as down, while the rendering goes on. In reality, I might have to wait a bit till the effect can be noticed.

For managing which CPU goes to which process, it will be hard to think up a useful application. So for me and you, we can tick off any processor. One note though: tick off all even or all odd processors first (*).

The disadvantage of managing available CPU capacity this way is that it remains a manual process.

(*) processors 0/1, 2/3 and so on are combined on one hardware module (core unit). When both processors on one unit are on, it will get hotter and the machine will slow that unit down. Hence, having processors 0 and 2, or 1 and 3 on will give us more speed (two medium hot units) than having 0 and 1 on and 2 and 3 off, or vice versa. (one hot one cool).

Assign Priority

This is the recommended, most flexible and best automated way to deal with the issue.


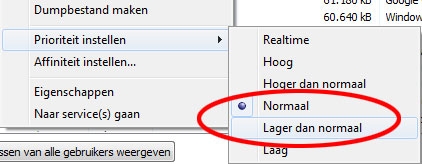
Just reduce the priority from “Normal” to “Lower than Normal” (see figure) and the machine will take care of everything.

I’ll get some warning messages which can be ignored. Now all other processes will get preference over the rendering, (I’ll notice an increased mouse sensitivity and improved performance immediately) while the rendering still gets all available CPU power available, but not used by other processes at that moment.

As long as there is plenty of processing power available, as is the case during the design process, there is hardly any harm in lowering the priority of Poser beforehand. The program will get all the attention it needs, in due time. When I do so, I will just notice that the responsiveness of the system stays intact while rendering tests. This even will be the case when Poser launches the renderer as a Separate Process, as discussed in the Ram Usage section. The simple reason for this is that a process can launch other processes like Poser can launch FFRender, but only with the same (or even lower) priority . In other words, when I assign the Poser process a Below Normal priority at the start, all the rest is taken care for.

Launching at reduced priority

From now on, I want to launch Poser with that Below Normal priority every time, without the hassle in TaskManager. That’s not too difficult:

  • I go to the place where I’ve got the shortcuts which I use to launch Poser.
  • I just make a copy of the Poser shortcut, and rename it to “Poser Low Prio” or something alike.
  • I right click it, and select Properties (usually the last one in the list of options).
  • I select the Shortcut tab. This will present a Target field containing the program path and executable, and the Start folder containing the program path alone.
  • Now I leave the Startup folder as it is, but I alter the Target to
    cmd /c start /BelowNormal Poser.exe
    (or PoserPro.exe, or Queuemanager.exe whichever I want to adjust)
  • I save with [OK]

From now on, every time I use that Poser Low Prio shortcut, my application is launched with the BelowNormal priority, and so will the FFRender when launched from Poser as a Separate Process. When I want to run in Normal priority, I just use the other shortcut and eventually adjust at runtime using TaskManager as described above.

However, when I launch Poser by double clicking a pz3 file instead, I’ll still get Poser in Normal Priority.

So I want to change that too! Not too difficult, but do note that we are descending to the deeper parts of the Windows OS.

  • Step 1: I create a batch file (say RunPoser.bat) which does the launch job
    • Actually, I create a txt file with the lines
      C:
      cd "\Program Files\Smith Micro\Poser Pro 2010"
      cmd /c start /belownormal PoserPro.exe %1
    • The first line will put me to my system drive, the second puts me in the path to the Poser executable (this will be different for the various Poser versions, yours may well read “…\Poser 9” or “…\Poser Pro 2012”. !! Note the quotes to handle spaces in the folder names properly. !! Also note that I have to adjust this .bat file after upgrading to another Poser version. The third line starts Poser, in your case it might read … Poser.exe …. Do not put quotes around the %1 here!
    • Now I save and rename the text file to RunPoser.bat (first I made sure I can see known extensions, it should not remain a text file!)
    • I put the RunPoser.bat in a convenient place (as in my C:\ root folder)
  • Step 2: I assign this batch command to the pz3 file extension
    • I open programs, desktop tools / accessories,
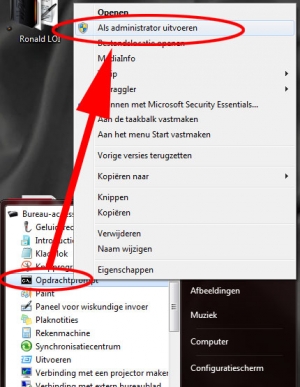
      right-click the Command option and run as administrator
    • this opens the CMD textual command box (good old MS-DOS like). Now I type ASSOC .pz3 (don’t forget the ‘.’ period before the pz3) and it answers with some association string (the internal file type, here: PoserProSceneAsciiFile). Now I type FTYPE <the internal type> and it answers <internal type>=<path>Poser.exe or in this example: <path>PoserPro.exe. I recommend to write that down somewhere, you’ll never know. It tells me that files of that type are opened with the Poser command, the “%1” at the end feeds it the pz3 file itself. The quotes are needed to ensure a proper handling of the spaces in the folder names.
    • Now I enter ftype <internal type>=c:\runposer.bat “%1” Of course, when you’ve chosen different names and places, use those.
    • I type exit to quit the command box

Now, when I double click a pz3 file, it opens Poser in the Below Normal priority.

As an extra: when I work with compressed .pzz files, I’ve got to repeat all this. These files are known as PoserProSceneBinaryFile, and so:

Notes:

  • according to some people on the Internet there is a way to get this done without the batch file, but I could not get it to work properly. Either it did not pick up the Poser starting folder, or it did launch just in Normal priority.
  • I do need admin rights to (re)set/write the FTYPE value as in the last step, but not to get/read it as in the first steps. I can always set it back to its original value.
  • I have to re-check those settings after upgrading to a new Poser version. The examples above are from Poser Pro 2010, but after installing Poser Pro 2012 I noticed that the associations had changed:
    • .pz3 => PoserSceneAsciiFile – without the Pro in the string
    • .pzz => PoserSceneBinaryFile – ditto
  • And indeed, after installing a Service Pack upgrade (I just installed Poser Pro 2012 SP2 over my existing Poser Pro 2012), I has to redo the .pzz and .pz3 file handling. And eventually, also the other Poser settings (external Libraries included) unless the “use existing files” is selected at the Service Pack installation.

Poser – the program (5 File Usage)

File Usage

As most programs, Poser uses files for output (saving scenes and images), while working (settings and intermediate) and for input (the library).

Saving results

Poser scene descriptions, saved as .pz3, are text files which include references to other files describing objects, textures and the like. Some of those other file formats, like .obj, are text files too. Files like that lend themselves perfectly for compression, decreasing file sizes 10 to 20 fold. That way a very simple scene like a light and a ball, taking 150kb in its bare form, only requires just 10kb to store.
This gives rise to the Poser compressed formats; .pzz (for .pz3 scenes), .obz (for .obj objects), .crz (for .cr2 characters) and so on. These can save a lot of disk space, especially when saving new versions of a scene file regularly during the development process.

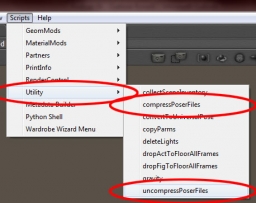
Poser can always read them, but when exchanging files to other programs it’s worth testing first. As the files are simply zipped, I can read them as well by using any unzipper, like WinZip or 7Zip or alike. Poser can also help me compressing and uncompressing files, via the Scripts \ Utility \ … menu options.
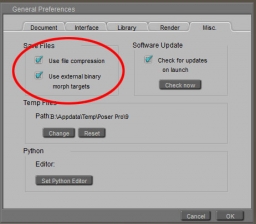
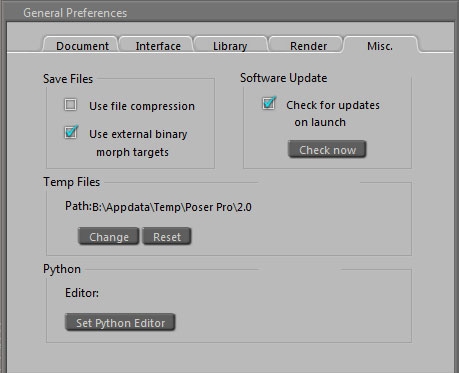
Poser saves scenes in compressed format when told to do so in the Edit \ General preferences \ Misc tab (check: Use file compression).

An alternative approach is to use compression of folders of even complete disks at the Windows level, in which case I have the benefit of reduced file sizes without the issues of any hampered file interchange with other software. But that approach might have some issues when transferring the disk itself to other computer hardware, say after a machine failure. Every pro has its cons, isn’t it?

Next to the scene files, Poser can save large portions of raw data, like morph targets, in separate files in binary form: the second checkbox in the Misc tab. The advantage of this is that it keeps the scene file relatively small while the binary file does not require further compression, and saves and loads as fast as possible. This results in .pmd files (Poser Morph Data).
Something similar happens when using the Cloth Room, making dynamic cloth(es) simulations. These result in .dyn (Dynamics) files that belong to the saved Poser scene. After creation but before save, these .dyn files are .tmp.
In my personal experience: when there are .pmd or .dyn files around, be careful with renaming or moving the scene file around. It might be better to open it, and to resave the scene with the new name and/or in the new destination.
For more details on Poser files, I consult the appendices in the Reference Manual.

Files while working

While working, Poser uses various settings files and places for intermediate storage.

Files to keep

From Win-Vista and up, files to keep are stored in C:\Documents & Settings\(user)\AppData\Roaming… or so, which is a hidden folder that can be accessed directly (without unhiding) using %appdata%\Roaming\… in the address bar. So, for my Poser Pro 2012: %appdata%\Roaming\Poser Pro\9 does the job. The presence of these in the Roaming… environment implies that in shared systems with roaming profiles, my files are transferred to the machine at hand.

Here I can find the settings files

  • LibraryPrefs.xml – describing the Runtimes attached to the Library
  • LibraryViews.xml – describing the options for the Library
  • Poser.ini – describing all Poser settings
  • And more

But also, I’ll find the RenderCache folder which contains all renders I’ve made in (16/32 bit per color, HDRI) EXR format, named after their moment of production (like: 2012-4-1_15hr6m21s.exr). As I dictate with “max cached renders”, only so many recent files are kept in store to save disk space. But they are not hold in memory, and as I’ve plenty of disk space I can afford a high setting. Except for large renders for print, files that display on my screen are well under 1Mb each.

Temporary files

Poser temporary files as stored in my (sometimes hidden) temp folder that can be accessed directly using %temp%\… . So for my PoserPro 2012, %temp%\Poser Pro\9 does the job. Here I can find:

  • PoserTextureCache – this folder contains the texture / image map files, translated to the (16/32 bit per color, HDRI) .exr format too. Poser keeps some portion of this information in memory to reduce disk access (see last image: Persistent Size in General Preferences, Render tab). Poser might tidy up this folder when starting a new scene or when (re)starting, but I’m not sure how good it is at doing so.
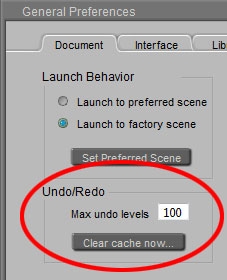
  • PoserUndoCache – this folder contains the information for the Undo levels. The document tab offers the option to set a max to the folder contents, and to clear the cache. Poser keeps some portion in memory to reduce disk access.

Poser – the program (6 Library)

The Library

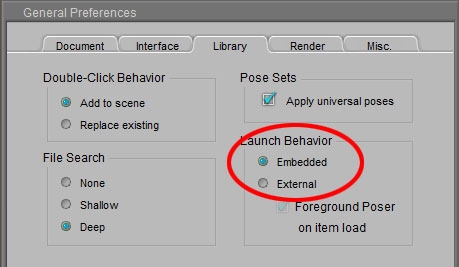
Depending on the Poser version I use, the Library can come as “internal” (or: embedded, as a regular Poser pane) or “external” (as a separate application). In the latter case, it might or might not be convenient when selecting an object brings Poser to the foreground or keeps the Library upfront. Poser to foreground means that I can quickly continue with my scene but also that for picking another object or pose or something I’ve got to bring up the Library again.

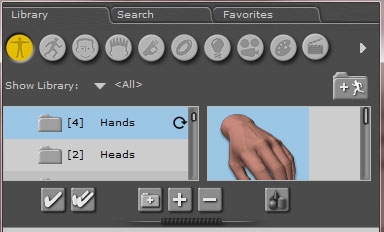
The Poser window presents a small button in the upper right corner to do so quickly.

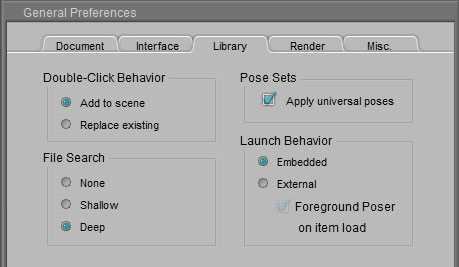
Relevant options for Library behavior like this can be found in the Library tab in General Preferences.

When I choose “embedded” (or when running the Library separately is not an option), I’ve got the choice between a docked and a floating form, like all other Poser panes. I found that the official manual is not always entirely correct in this, so I just try for myself what works out. (Note: see the Corrections and Additions post).

The structure of the library is quite straightforward from a technical point of view, but quite cumbersome from a user point of view: within each <base folder> I’ve got a folder called Runtime, containing subfolders Geometries (hosting the .obj object meshes), Textures (hosting the image maps), a lot more, and the Libraries folder which is addressed by the Library itself.

This Libraries folder contains (category) subfolders Camera, Character, and so on, and each of them contains files in specific formats, and thumbnail images in .png. The Library application (or pane) gives me access to the library (= the <base folder>) and the specific category (= subfolder in Runtime\Libraries) of my choice.

So if my selected Library is “Poser Pro 2010” and my selected category is “character” then I’ll see all subfolders within Poser Pro 2010 \ Runtime \ Libraries \ Character and only the .cr2 files within these. (Note: see the Corrections and Additions post).

Folder \ category File
Camera .cm2, .cmz These cannot be used in Daz Studio and alike
Character .cr2, .crz but also .pmd, .obj, .obz For poseable figures and conforming clothes, with an internal “bone structure”
Face .fc2, fcz Expressions, essentially these are morph targets and settings
Hair .hr2, .hrz Hair might be a sort of conforming clothes (cr2), or a prop (pp2), but stored as hr2. Or dynamic hair, which requires an object to set the hair roots. Usually a skull cap is used for this.
Hand .hd2, .hdz Poses. Note that a hand contains as much components as the rest of a body.
Light .lt2, .ltz These cannot be used in Daz Studio and alike
Materials .mc6, .mcz (mat collections), .mt5 (single mat) A mat collection maps a series of single mat defs onto a series of mat zones of an object. Include references to texture files / image maps.
Pose .pz2, .p2z Body pose, usually without the hands. Unfortunately, a remapping of a mat collection with just other image maps and mat def settings is a “Mat Pose” and lands in this section as well.
Props .pp2, .ppz Non-poseable objects, without an internal bone structure. This includes clothes which are not meant for conforming but are for dynamic use only.
Scene .pz3, .pzz Full scenes, as I create and render.

The result of the way of working of the Library is a well understood confusion for users. The files for a figure, with expressions, poses, hair and a set of skin variations, are scattered around the Library. Some people therefore create a separate Runtime for every figure, but with a growing wardrobe a separate closet for each robe becomes impractical.

This is where the Favorites kick in: I can define my own structure and put say a dress and all its mat files, accompanying jewelry and more, all in one place. These places are subfolders in Runtime \ Libraries \ Collections, and they host just shortcuts to the mentioned files, plus a copy of their thumbnail image.

At the top-right of the Library window you might have noticed a “+ Runtime-folder” button, this one adds extra (external) runtimes to the selection, and adds an entry line in the LibraryPrefs.xml settings. In order to remove a Runtime from the collection, I have to select that one first using the Show Library list. Just clicking it in the list is not enough. After selection only the contents of that Runtime are shown, but also a “- Runtime-folder” button appears. That is, if it concerns a Runtime I’ve added myself earlier, I cannot delete the Runtimes which came at install time. And… I don’t delete anything except the reference to the content, not any content itself.

At the bottom of the Library panel I’ve got

  • Buttons for adding content to my scene. Either just adding, or replacing a selected object. This latter option is quite relevant in a stepwise refinement approach to scene development. I can have a low resolution character taking a pose etcetera, and after all preliminary tests are done I replace this mannequin with a full blown dressed up and detailed textured character for my final renders. This approach might speed up my development process, especially on low-end computer systems.
    Details on this depend on the category: figures can add or replace, poses only can replace existing poses, and so on.
    Tip: be sure to read the Reference Manual on replacing figures (chapter 7), and on the options in the Replace Figure dialog which appears when doing so.
  • Buttons for adding folders, and for adding and deleting content itself. This concerns actual files in the Runtime and in the category I selected. So when I select a character, and a Runtime “A” and say category Pose, and I’m looking at a subfolder “B” thereof, then the body pose of that character is saved into …\A\Runtime\Libraries\Pose\B.
    And please note: it really deletes content when asked to!!
  • An “Add to Favorites” button, and then I can tell where.

When I’m in the Favorites tab, I’ll have the add-to-scene, the “add folder to favorites” and the “delete item from favorites” buttons. The latter only deletes the shortcut and thumbnail in the Collections, the original content itself remains untouched.

The behavior of the Library utility is managed at two places:

  • The Library tab in General Settings
    • Double Click behavior, by default (Add to Scene), the double click acts like the double-check add button. The safe way, as replacing is destructive in my scene: I lose the original figure when doing so.
      But if I want my double-click to match the single-check replace button, I can have it my way.
    • Poses that came with figures from Poser 6 or earlier applied properly to those figures only. Poses that came with Poser 7 and later can be applied universally. When the box is checked, poses added to the library will be saved as universal poses. So in order to apply Kate’s pose to James: apply the pose to Kate, save Kate’s pose, this will turn it into a universal pose, which then can be applied to James. Applying Kate’s pose directly to James might not work out well.
    • Next to Library and Favorites, the Library offers a Search function. This can find figures, poses, and whatever. And I can do a search in one specific category in all Runtimes, which might be pretty handy.
      When loading any file which references to other files (like a character is referencing the .obj mesh definition, and a material is referencing an image file), Poser itself performs a search for those referenced files.
      The File Search option tells Poser what to do: just look at the defined places or just next to the selected library item (“None”), or look through the entire set of all libraries (“Deep”), or something in-between to save search time (“Shallow”). Actually, Deep is recommended for scene building except for very large libraries on low-end machines, None is recommended for content developer to check whether all paths are properly defined.
      Anyway, if I load a scene or element which references to mesh definitions or textures which are only available in a Runtime which is not attached to the Library yet, Poser cannot find that mesh or texture. But also, when I load a Poser scene which contains such an element into Vue, then again all questions on file location will be asked again. Vue asks Poser for the file and Poser will check the Runtimes which are attached to the Library. Typical example: I’ve build a scene in Poser 8, I upgrade to Poser 9 (or just to a new Service Pack) and load the scene back in to find out about the new program. Lots of file warnings. I just haven’t attached the external runtimes to the new Library yet. Happens to me all the time.
  • The Library settings themselves.
    The Library Window itself contains a shipload of possibilities to adjust the way it presents my content. These are revealed (and hidden again) when clicking the separator bar underneath the Library panes.

The General section manages the behavior of the Library Window, the Display section manages which panes are displayed, and the first three of them have their further details set in the remaining three sections.

Just see for yourself whether you need the Extended Details. The Breadcrumb bar might be handy for maneuvering around, and the Ticker brings us to various sections of the Smith Micro website.

The various options are well described in the Reference Manual (chapter 7).

Poser – the program (7 Settings)

Poser Settings

The behavior of the Poser program can be adjusted by the various settings in the General Preferences (in the Edit menu, or via Ctrl+K). To be honest, those settings are the result of a long life full of developments, and so the organization of the options is not always clear to everyone.

Saving the user interface

For instance, Poser has quite a flexible user interface. I can change the whereabouts of the various panels, I can make panels – including the Render/preview (aka: Document) pane – float to maximize the use of my dual-monitor system, I can change the way objects are displaced in the Document panel, and so on. And I can save all this for use in later sessions.

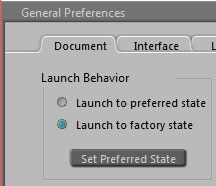
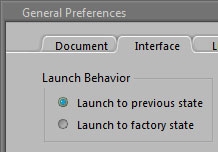
I can do so in the Document tab … and I can do so in the Interface tab

When I set to save my preferences in the Documents tab, it saves the Display Style (Texture Shaded, Cartoon, …), and the Display Tracking, Depth Cue and Display Shadows settings. As I never alter those settings structurally, I’ll leave them to factory settings: Texture Shaded, Full tracking, Depth Cue off and Shadows on. The saving is done when I click [Set Preferred State], check the Preferred State option and click [OK]. Again: I hardly use this.

When I set to save my preferences in the Interface tab, it saves all panel sizes, locations, whether they show, hide, dock or float – and where on my desktop – and the way the Document Windows is laid out: one view, four views, etc. As I do like to continue my work where I left off, I launch to previous state here. Unless I’ve made a mess of all of it and I like a clean start, then I select Factory state for once, close Poser, reopen it and check Previous state again. The saving is done every time I close Poser.

Mouse usage, also a decent part of the User Interface, is arranged for in the Interface tab.

Where I can enable Tablet Mode, that is: a large distance by pen is translated to a small distance in the Document Window, for greater accuracy. And I can alter the behavior of a 3D Mouse, so when I pull it (decrease Z value) the object or camera moves towards me (increasing Z value instead). And so on. This is because other programs might have the positive Z-axes pointing backwards.

Performance settings

The settings which effect RAM and CPU usage are scattered around the Preferences tabs, at least to my sense of logic. Some of them do not apply to Poser 8 or earlier.

The Document tab let me change the amount of Undo levels (these consume some RAM usage but are stored on disk mainly) and allow for multithreading (consumes processing power during design time) when bending objects.


On modern machines the default values (100 levels and Multithreaded ON) are fine. But perhaps adjustments improve the performance of older laptops running 32bit Windows. Which then are not used for rendering I hope.

Other performance effectors are in the Render tab.

Separate Process (OFF by default) forks out the renderer which therefore is freed from all the hassle from the design process, a memory saver as discussed in the RAM usage section. Number of threads should be left to a default (it auto detects the machines maximum). See the CPU usage section on how to launch Poser in reduced priority mode, which is a far better mechanism.

Caching renders, caching textures and caching undo levels are about similar: as discussed in the File Usage chapter (Files while working), the information is stored on disk but portions are kept in memory to reduce continuous disk access. Thanks to the severe compression of images, a 100kb EXR file on disk might take 4Mb space in memory. But usually rendering is the process which makes us short of RAM, and rendering as a separate process is the answer to that.

Object handling

This is another subject which is scattered over tabs.

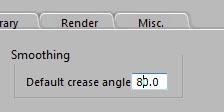
The document tab offers the Default crease angle
while the Interface tab offers the Display units setting

Crease angles

Crease angles effect the rendering result; two adjacent polygons which make an angle larger that this value will have a sharp edge in between, while the edges between polygons with a shallower angle will get smoothed. The Smoothing setting Default… will set the crease angle for objects which are loaded into the scene, and do not have their crease angle set already (see *).

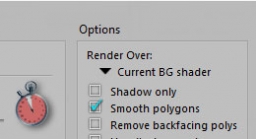
Experiencing any effect of this requires the Smooth Polygons switch is ON in the Render Settings (OFF by default to save RAM and CPU requirements at the cost of producing a reduced quality result).
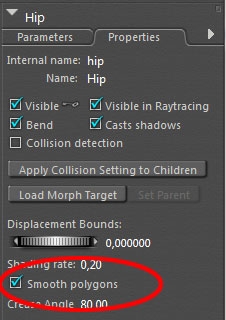
It also requires that the Smooth Polygons switch is ON for all objects required. This switch can be found in the Properties tab of the object(part), see image on the left.By default it’s ON so the Render Setting affects all objects, but I can switch it OFF to prevent a nice fragmented object to become smoothed out.Here I can set a particular crease angle as well.

I can reduce the value to give the object its faceted appearance (eg when the objects goes ‘blobby’), or raise the value to reduce the facets seen in the render result. Values from 89.5 and up are to be avoided as they turn a decent cube into a ball. But okay, it’s your render.

(*) when I load Vicky, or Grey Alien or whatever Poser figure I’ll find out that its crease angles are set to the Poser default 80, whatever my settings are in the General Preferences. But when I load a Primitive Prop (ball, cube) or a non-Poser object from an OBJ file or alike, the General Preference settings are taken into account.

Display Units

All Poser objects and scenes are saved in Poser Native Units, and just for user communication are translated to other units like inches or meters. Basically, when I (having a Meters-setting) save a scene, send it to you and you (with an Inches setting) read it back in, we’ll deal with the same thing. My 1,0 (meter) will end up as 39,4 (inches) on your Poser display.But there are some pitfalls.

  • When importing objects in any 3D format, they are set to x% of a normal figures height which is about 6 feet = 72 inches = 183 cm. So, for churches I’d better set a high value for x and for mushrooms I set a low value unless I want my 6 feet elves to sit upon them.
  • The values used for cloth behavior in the Cloth Room are all based on grams (not: kilos), meters and frames (not: seconds) and do not change when I alter the Display Units. In case, you need to perform the meters-to-inches conversion yourself.

The Library tab

Well, it handles all interfacing with the Library. Actually there is no reason to change any of the default values. The details were discussed already in the Library section of this series.

The Misc tab

Actually this tab contains all file handling options, like Compression. Native Poser files are in ASCII (character) format, which makes them favorite for compression. For example: the basic scene showing Andy takes about 400kB uncompressed (PZ3 format), and 24kB compressed (PZZ format).


However, some additional programs cannot handle PZZ files, which forces me to serve them uncompressed pz3 material. On the other hand, when I’m into scene development and store over ten versions of my project file, compressing is a serious disk space saver. So I have this option checked. Anyway, there is an (un)compress function in the Scripts \ Utility menu to handle separate files and folders afterwards.
When you decide to work with compressed files, and you want your Poser to start in Below Priority mode after double clicking the .pzz file, read the CPU Usage section on the way to accomplish this.

Use External Binary Morph targets (or: EBMT) creates additional .PMD files which allow for various modern Poser features. It should only be off when you want to open your files in legacy Poser programs. I don’t, so I leave this option checked.

Whether you want to get a signal when Smith Micro has issued a new version is up to you, and a Python editor is relevant for Python script developers only. I’m not one of them. Sometimes just Notepad or Wordpad is the program of choice, but there are some dedicated scripting editors around.

The Temp folder is used for caching Undo levels, Shadow maps, intermediate Render steps, scene Textures and more, and by default the standard user temp folder is used. Just clean up this folder regularly, a load of other programs are putting their temp stuff in there too. My personal solution is to dedicate a part of my plethora of RAM memory to emulate a hard drive, aka a RAM Drive (B:\). It’s pretty fast. And, every time I start up or reboot my system, it’s empty. I can recommend RamDisk for jobs like this.
Poser – the program (8 Strategies)

Rendering strategies

So, up till now I’ve discussed the technical side: how to get the program up and running properly. In the next chapters, I’ll discuss ways to use the program efficiently, regarding the way Poser fits into the entire workflow.

Generally, when I click the Render button, Poser will run the renderer as an internal process. I can watch the progress in the Render pane, and I’ll have to wait till it’s finished. One of the disadvantages is that the render process caries all the load (or: the memory usage) of the design process as well. On 32bit environments (Poser and/or OS), this might bring the program over the cliff when the rendering requires more memory than can be presented. The limit is 2Gb for Poser on 32bit Windows, or up to 3Gb for Poser on Mac, Poser on 32bit Windows with special measures, or 32bit Poser on a 64bit system. See the RAM Usage chapter and eventually my Breaking the 2Gb Barrier tutorial on handling all this.
One solution is to check the Separate Process option in the General Setting, which will run the renderer as an external process, explicitly present (as FFRender.exe) in Task Manager. This will free the rendering from the design overhead, and enables fuller or more detailed scenes to be rendered. But I still have to wait till the process is finished.

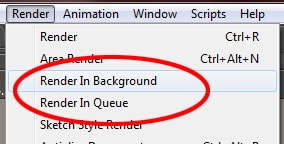
The second solution is to use Render in Background from the Render menu. As can be expected, I now can continue my design work while rendering simultaneously.
This option is not available in Poser, it’s Poser Pro only.

Note 1: while rendering in the background, I cannot start a second render process, say for testing a scene. I can do design only.
Note 2: when I experience user interface issues while rendering in background, like nasty mouse behavior, I can improve on that by running Poser itself in Below Normal priority mode as explained in the CPU Usage chapter. This will also launch the background processes in the same Below Normal priority, giving me a smooth user interface behavior.

The third solution is to Render in Queue, again: not in Poser, it’s Poser Pro only. Actually this will launch the Poser Queue Manager which in turn will render the scene. Since this is a process on its own, I can continue designing as well as rendering in Poser.

Note: whether I Render in Background or Render in Queue can be set in the Render Settings too:

Queue Manager and Priority

Note: Queue Manager is Poser Pro only, sorry for that.

Queue Manager comes in two parts: the working process and the user interface to view and manage all this. When Poser runs Render in Background, it actually launches the QM working process (when it’s not active already), feeds it the scene, continues the design process while the rendering produces its result, and finally reels the result back in. The working process isn’t killed until my system terminates. When Poser runs Render in Queue it launches the working process as well as the user interface to it, or when the working process is already active, it launches the user interface only. Then Poser feeds the scene to the working process, and continues. When I stop the QM (after handling all jobs in the queue), I will only kill the user interface as the working process stays alive till my system is terminated.
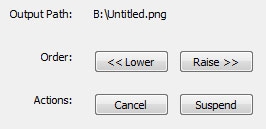
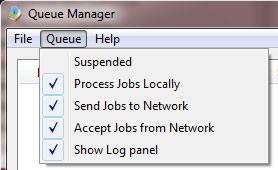
I can also launch the QM from the shortcut that comes at installation. This also launches the working process as well as the user interface, and when the working process is already active (from an earlier launch from Poser), it launches the user interface only. And again, when I stop the QM (after handling the queue), I will only kill the user interface as the working process stays alive till my system is terminated.

Why does this matter? Well, when the working process is launched from Poser, it takes the priority of the Poser process. When Poser runs at Below Normal, then so will Queue Manager, and so will the rendering launched from it. It gives me decent mouse behavior but Poser itself will run at the same priority as the rendering, and Posers performance and responsiveness will suffer.

This can be solved by launching Queue Manager from the shortcut, before I ask Poser to perform any Background or Queue render, and ensure that the shortcut launch results in a priority even below Posers. And when Poser runs in Below Normal mode, Queue Manager should be launched as Low.

So, I changed the shortcut target to : cmd /c start /Low QueueManager.exe

Queue Manager and Networking

When Queue Manager is active on several machines within the same network, then each one which has got assigned specific jobs from the Poser on that machine will try to share its load with other instances. Even the simple case of one Poser user launching render jobs into the Queue requires QM to be started before that on other machines that take part in the rendering process. This for instance can be part of the machine boot cycle (just put the shortcut in the startup folder). When such a QM instance is launched at BelowNormal or Low priority, changes are that any user on that machine won’t notice its additional use. This way even the full CPU power of the whole office can be utilized. Additional instances of Poser on other machines then can take part in the party: they only have to join in.

Do note that QM takes the render of each separate frame as a (part of a) queued job running FireFly. QM cannot render in Toon or Sketch mode, and animations should render to image files and not to some movie format. I need a movie editor to combine the frames to one movie file. And to make it really work: all machines should have the same address for output, like X:\mymovie\… This by the way is the way professionals and studios work: assembling the movie file is one of the very last steps in the process.

Each frame then can be handled in a separate machine, but various machines cannot work on parts of the same image. This is the opposite of the rendering in one machine; all threads render parts of the same image but all render the same frame at the same time.

The Queue manager interface offers a few options:

  • File \ Quit – quits the user interface but leaves the working process alive. Just re-launch QM from the shortcut again to get the GUI back.
  • File \ Exit – quits the user interface as well as the working process
  • Queue \ Suspend – pauses all running and unfinished jobs. I can also suspend or cancel a single selected job, using the Selected Job options below the job list panel. I can also reorder the (waiting) jobs.
  • Queue \ Process Locally – meaningful in a Network setup only. Checking OFF frees the Poser machine for design and test-rendering while using the other machines for handling the queue, in other words: the Local QM acts as client / manager only while the other machines act as server / worker. When ON, also the Poser machine itself takes part in the work and the Local QM acts as client/server or: manager/(co)worker. And of course when the Poser machine is the only one alive, it’d better be ON to get any work done at all. I guess the renderer will finish its current frame but will not pick up anew, when I check off. It will not stop halfway.
  • Queue \ Send Jobs to Network enables (when: ON) client / managers to utilize the network rendering features. Servers / workers do not send jobs around. One reason to switch this OFF is when I want the QM on my machine to process jobs as a nifty background processor, without loading other network nodes. When the Poser machine is the only one alive (no rendering network), this option is meaningless. Again, I guess that QM will finish its current frames but will not send out a new, when I check off. It will not stop halfway.
  • Queue \ Accept Jobs from Network enables the server / worker role from Poser rendering requests from other machines. Of course this should be enabled (ON) for non-Poser machines as otherwise they don’t take part in the rendering network. This option differs from the previous Process Jobs Locally as the latter concerns jobs from the Poser on the same machine. When the Poser machine is the only one alive, this option is meaningless. Here too, I guess the renderer will finish its current frame but will not accept anew, when I check off. It will not stop halfway.
  • The Log-panel is the third part of the user interface, I can show or hide it. Anyway, QM creates a log in the users Temp environment, and resets it at any new launch of the working process.

Rendering in the cloud

So I can run Queue Manager on the same computer as I’m running Poser. And I can use Queue Manager to render out to another machine, if available. Buying a second machine just for rendering proves hardly to be cost-effective, especially for hobbyists and artists on a budget. But what about renting one by the hour?

This is made possible by “Rendering in the Cloud”, just paying for machine cycles by the hour after I’ve setup my Poser Queue Manager out there as I would have done otherwise.

But be aware, and sort out price/performance issues first. Some websites are already publishing benchmarking figures and price comparisons. At the moment of writing this (March 2012), a service comparable to my own machine costs:

But this does not mean Windows is always available as a service. At the moment Amazon has, Storm has not. It also does not mean that the accompanying disk storage comes for free – usually it’s a fixed subscription fee from $20 to $200 per month. But it does mean that there are alternatives for boosting my rendering abilities, and it suggests that things might change a lot in the next few years.

At Renderosity.com some forum threads can be found on setting up such a cloud-rendering configuration. Issues people are facing are:

  • setting up the networking details such that Poser (on the local box) communicates with the Queue Manager (on the remote site). This is far from trivial, the details are in virtual LANs, firewall rules and ports to open. I won’t go into details here as things might evolve rapidly. When you’re up to it, consult the forums.
  • handling the network load. A serious scene including all meshes and image maps might take 200Mbytes = 2000Mbits which hence requires 2000 sec (=35 min) to upload over a relatively fast 1Mbps upload link. So if the render itself takes 20 mins, this setup renders 1 image per hour (35 min upload, 20 min render, 5 min download). This seriously cripples the overall machine performance.

Summary

Bringing it all together:

  • One off: When on a 32bit Windows; enable the 3Gb-switch
  • In Poser, enable rendering as a separate process
  • For Poser Pro:
    • Launch Queue Manager first, at Low priority. Do so on all machines in the rendering network. Then launch Poser, at BelowNormal priority
    • Send all (semi)final large scale renders, animation sequences and time consuming IDL renders to the queue. Now one can even pause the rendering when it’s hampering test-renders, the design workflow or anything else. And one can re-order jobs to get specific results earlier.
    • Note that you don’t have to own all rendering power yourself. Renting by the hour becomes an option, in due time, at least for intense rendering bursts during a short period.

Poser – the program (9 Workflow)

Workflow considerations

Everyone involved in 3D is aware of the simple relationship between image size and quality on one hand, and system resource (Ram, Cpu) usage and rendering time on the other hand: they all go up, or down, simultaneously. This calls for a stepwise refining workflow: gradually go up, while getting the maximum benefits from the fast modes.

Of course everyone has his or her own way of work, but it never hurts to give this look-before-you-leap approach a second thought.

Step 1 Rough Design

A picture tells a thousand words, so it won’t harm me to write down the goal I want to accomplish in less than hundred.

Then I set the image size or at least its proportions (aspect ratio), create the (Dolly) camera which is going to take the shots, build the scenery including props and put the figures where I want them. I do so in low resolution, like using blocks and other primitives instead of the real details, using copies of Andy instead of the full dressed Vickys and so on. Now I should be able to get the camera settings right, and to establish the lighting setup. Almost all details of cameras and light could be established in this phase already.

Figures, props and scene elements can be assigned the right basic surface properties, especially color, as well as location and body pose. No details, which is why Andy has no expressions and no fingers, but does have the full rigging (bone structure) of a hires character like Vicky. Note: Andy2 (Poser 9 / Poser Pro 2012) does have fingers too.

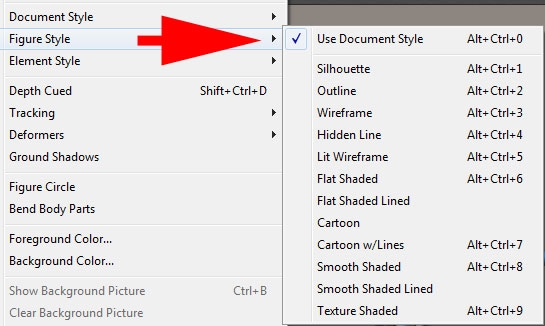
To find out the basic impression of the image (does it communicate the message?), I set and switch the display style of the whole Document, of each figure individually or even of specific figure elements. Each of those can be set in the Display menu:

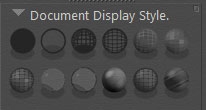
All those can be switched from the Document Display Style panel:

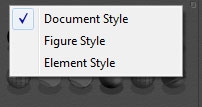
And I can choose what is going to be affected as well:


The ones I use most are:

  • Outline (Ctrl+2), literally to draw the line of the objects whereabouts, works as a Document style
  • Silhouette (Ctrl+1), to check whether poses do communicate, works on Figures but hardly on the whole scene
  • Cartoon with Line (Ctrl+7), is just a more advanced and somewhat shadowed silhouette
  • Smooth Shaded (Ctrl+8), shows the base surface color without textures and so gives a quick color impression

The default Texture Shaded (Ctrl+9) actually becomes relevant after texturing, and usually after bringing in the real (and textured) scene elements, figures and clothes.

This “phase one” approach becomes especially relevant when building animations. Camera paths, focal changes, following spots and alternating lighting strengths, the effects of major color shifts, finding out whether objects stand in the way but also most pose changes, body moves and collision risks too can be addressed.

Next to that, this “phase one” scene or animation is a very good starting point to test the overall workflow. Post-processing and Photoshop interfacing, movie frame production and video editing, syncing animation with sound and music, deploying Pose2Lux and LuxRender for high end results, eventual Background, Queue and Network rendering, establishing the proper project folder setup. Whatever I’m going to accomplish: I get an end-to-end test early on the easiest ‘this took me a day’ scene around, instead of on a fully loaded and fine detailed ‘took me four months’ result. Because fixing thinks also requires far less time.

During this phase, the default render setting is fine: just casting shadows, no raytracing, no options checked. And if I want to test my IDL / IBL / Global Illumination / SkyDome setting: I use a very low value for Irradiance caching.

Step 2 Fine design

Well, I gradually improve the quality and detail in the scene. I replace the primitive shapes by the final scene elements, replace the Andys by Vickys or alike, give them clothes, replace base colors by textures, bump / displacement maps and whatever, start deploying dynamic hair and cloth and tweak animations, camera settings and light sets accordingly. Just step by step.

While doing so, I keep on testing the major pieces of the remaining workflow, especially those that are apt to break due to newly added elements. When I know up to which version of the project everything was functioning, fault finding becomes much easier than on the final result without intermediate steps. I also check the settings for new materials and texture maps after replacing objects and assigning material sets. Especially when using Poser Pro 2010 and up, the Gamma settings and color swatches need attention. This is dealt with in detail in my separate Understanding Corrections tutorial.

While improving on the project details, also the render quality can be improved upon. The Auto-settings go from 1 to 9 – numbers are not visible though. Draft equals 2, Default equals 4 and Final equals 8 which is fine for all electronic publishing (eBooks, DVD, web gallery, …). The extreme setting (9) might have some use for fine print only (real world exposition gallery print result, art magazine) as it sort of doubles the resolution (level of detail), which cause a four times or more longer render time.

At the same time, I start on checking the render options. Smooth polygons (increases render time somewhat), use displacement maps – in my materials as well (this really might be a RAM killer!!), apply depth of field (focal blur) and 3D motion blur when appropriate (these might about double render time), and eventually apply a post filter sharpening the bump and texture details.

The manual render settings let me also:

  • Increase raytrace bounces, to handle extra reflection-in-reflection (having the Silver Surfer as a figure) or refraction-on-refraction (looking through a series of glass objects) in the scene.
  • Switching on Indirect Light, and set the quality
  • Reduce Irradiance caching, Pixel samples or increase Shading rate to reduce render times while remain quality by the other settings
  • Increase bucket size (say doubling) which will give a slight reduction in render time (say 5%) while requiring somewhat more ram (5% as well), but it mainly works out for a large image and a limited number of threads as the render is only finished till the last thread is done. Honestly, I never do it.
  • Adjust Displacement bounds, when the use of displacement maps is checked. Note that I have to fill the Displacement slots in the materials as well !

One way to achieve high quality test results fast is to deploy area rendering: just rendering a small portion of the scene. This works for investigating texturing or lighting details, which are not easily seen in the preview. Think for example of reflection and refraction, and displacements and shadowing of it.

Another practical way is to test any post processing on low resolution results. Layering, color correction, masking and the like can be set for lowres renders first, and just need refinement later. But this saves me the burden of handling tens of layers and settings with 7000×5000 images.

Poser – the program (X Professional)

Professional considerations

One day while visiting the Poser forum on Renderosity I ran into the following dialogue:

A: given my scene lighting (…), how can I get the proper shadows between the car/tires and the ground?
B: just paint them in, using Photoshop
A: that’s cheating!

The other day I visited one of my favorite galleries of a guy photographing fashion models. He wrote:

I do like to try to evoke an expression that is often not a young model’s natural go to look. Sometimes it works and other times it requires tweaking in Photoshop. Funny side note – there are at least 3 images in various places online where a model is getting comments referring to her amazing expression when most of the expression is the result of my application of the liquefy filter… .

Believe me, if I want to become the utmost Poser guru on Earth, the first route is the one to take. Never cheat anything. But if I’m on a budget, on the deadline, or just want to make a series of interesting images during my holiday leave instead of one single perfect render in my whole life, the second route is more profitable. That is what matte background painters do. That is what the special effects guys (and girls) are for. Professionals cheat, they do so knowledgably, and all pro software gives it the full support it deserves. Poser too offers some support, which can be extended using plugins like Advanced Render Settings.

In general, the golden rule for professionals is: never do in 3D what can be done in 2D, aka: invest in pre- and post production. For instance, in scene and object creation:

  • Background images instead of complete full depth 3D scenes
  • Billboard or simple texture mapped block objects instead of full detail 3D ones
  • Bump (at larger distance) and Displacement (shorter distance) textures instead of full detail 3D modeling

And in post

  • Separate renders for Color (Beauty pass, Diffuse), Shine (Specularity), Reflection and the like
  • Separate renders for (groups of) lights / radiosity, and of shadows / ambient occlusion
  • Separate renders for masking objects and material zones
  • No render at all but just a 3D import into Photoshop
  • And finally blending and adjusting image layers in Photoshop

The main reasons are

  • During design, it’s far more flexible. I, or any client, might develop new ideas on the spot when viewing the first concepts. This way it’s easy to create and annotate variations, and to evaluate them on the go. The result is a more robust evaluated concept which has a better change making it to the end.
  • In 3D, I can tweak shadows and highlights forever, and when I’m deploying IDL at print-size (3500×2500 magazine or even 7000×5000 poster) image format waiting another 24 hours for my tenth ‘final’ render is not something I’m looking forward to. Photoshop is just blazingly faster and much more interactive.
  • In 3D, some things just don’t work out unless I spend hours getting it sorted. Conforming clothes which don’t fully wrinkle, Dynamic clothes with a little poke-through, small areas without a shadow, reflections being too strong or too sharp, you name it. Everything that can go wrong, will. Especially when I’m on a deadline.

Surprisingly, this holds even more for hobbyists than pros. Most amateurs have a regular day-job, kids or whatever which leaves them with just an hour a day for their project. They also lack training, and a senior staff member teaching them the tricks of the trade. And while they might not have clients, they might have mental deadlines. Images which should be ready as a birthday gift. Images which should be done so they can move on to the next idea they got recently.

Remember, a lot of pro photographs are post processed for various reasons. Renders are just virtual photographs. So why not playing a similar game? So instead of mastering Poser, one should first master character, fashion or nude photography, and post processing techniques. The best arrangement for Material Room nodes or the best dial settings in Cloth Room might be a lesser concern. That’s my opinion, at least.

As I said, Advanced Render Settings will be your friend, but Poser itself offers some tools too.

  • Render A with Cast Shadows unchecked, and render B with both Cast Shadows and Shadows Only checked.
    Add image B in Photoshop on top of layer A, set B in multiply mode and adjust its strength. Now I’ve got full interactive control over my shadows.
  • Render without and with Gamma Correction switched on (Poser Pro only) and blend the results.
  • Render without and with Depth of Field checked, blend the results.
  • Render with groups of lights on / off, and add the results while varying the contribution of each (can be tedious with many lights)
  • And so on. What can result from interactively blending with and without Raytracing, with and without InDirect Light, with and without Ambient Occlusion on the lights? Photoshop layers can be subtracted to get the net effect only, which in turn can be blurred, or brightened, darkened, contrasted, etcetera.