CPU Usage
While designing a scene, Poser might be high on memory requirements but stays rather low on processing power. Let alone some exceptions Poser is a single thread process, while most modern machines can handle numerous threads simultaneously. Even for laptops and office desktops, two is a minimum nowadays. Only rendering kills the available CPU capacity, as Poser tends to use all available resources to the max.
This can be annoying when the rendering takes a long time (to whatever standard) and one wants to use the machine for other tasks as well. Then the machine turns out te be quite unresponsive. From making a slow mouse response or seriously disturbing game or video playback to loosing connection to other machines or the net thanks to missing response deadlines, it’s plain annoying.
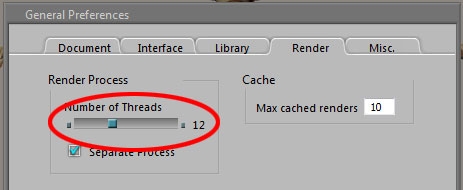
One approach people take is to reduce the load from the Poser settings. Again, they’re in the General Settings, Render tab
and by default Poser wants to utilize all available threads. In my case, as shown above, that’s 12 (as I’ve got an Intel 990X 6-core hyperthreading CPU in the box).
I can reduce it to 11, 10 or what I want, reducing the max CPU load and freeing some capacity for other use. And of course I can increase the number even up to 32, although issuing more threads than can be simultaneously processed will not give any speed increase. The problem with this method however is, that it’s rude, unnecessary and above all: cannot be adjusted at runtime. One has to make the right guess before clicking the render button, and the setting lasts at least as long as the render. The non-assigned capacity is then available to the other processes in the machine.
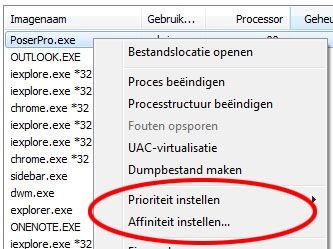
More gentle as well as flexible methods can be found in the operating system (Windows, I’m not that familiar with Apple, sorry). We’ll find them in TaskManager, Processes tab when right-clicking the process at hand:
They are called: Assign Priority, and Assign Affinity.
Assign Affinity
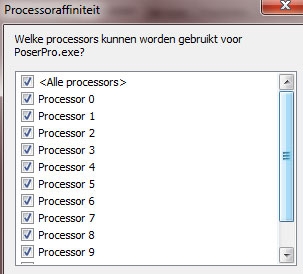
When I click this option I’ll get a list of available processors (=threads, see image):
As can be expected in my 6-core hyperthreaded machine, the twelve processes are numbered 0 to 11. I can tick them on/off, and after [OK] I’ve got less or more CPU capacity available for that process. Essentially this is just a variety on adjusting the Poser setting as discussed above. With one major difference: this Affinity can be adjusted at runtime, up as well as down, while the rendering goes on. In reality, I might have to wait a bit till the effect can be noticed.
For managing which CPU goes to which process, it will be hard to think up a useful application. So for me and you, we can tick off any processor. One note though: tick off all even or all odd processors first (*).
The disadvantage of managing available CPU capacity this way is that it remains a manual process.
(*) processors 0/1, 2/3 and so on are combined on one hardware module (core unit). When both processors on one unit are on, it will get hotter and the machine will slow that unit down. Hence, having processors 0 and 2, or 1 and 3 on will give us more speed (two medium hot units) than having 0 and 1 on and 2 and 3 off, or vice versa. (one hot one cool).
Assign Priority
This is the recommended, most flexible and best automated way to deal with the issue.
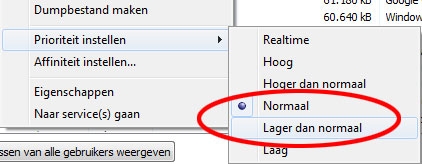
Just reduce the priority from “Normal” to “Lower than Normal” (see figure) and the machine will take care of everything.
I’ll get some warning messages which can be ignored. Now all other processes will get preference over the rendering, (I’ll notice an increased mouse sensitivity and improved performance immediately) while the rendering still gets all available CPU power available, but not used by other processes at that moment.
As long as there is plenty of processing power available, as is the case during the design process, there is hardly any harm in lowering the priority of Poser beforehand. The program will get all the attention it needs, in due time. When I do so, I will just notice that the responsiveness of the system stays intact while rendering tests. This even will be the case when Poser launches the renderer as a Separate Process, as discussed in the Ram Usage section. The simple reason for this is that a process can launch other processes like Poser can launch FFRender, but only with the same (or even lower) priority . In other words, when I assign the Poser process a Below Normal priority at the start, all the rest is taken care for.
Launching at reduced priority
From now on, I want to launch Poser with that Below Normal priority every time, without the hassle in TaskManager. That’s not too difficult:
- I go to the place where I’ve got the shortcuts which I use to launch Poser.
- I just make a copy of the Poser shortcut, and rename it to “Poser Low Prio” or something alike.
- I right click it, and select Properties (usually the last one in the list of options).
- I select the Shortcut tab. This will present a Target field containing the program path and executable, and the Start folder containing the program path alone.
- Now I leave the Startup folder as it is, but I alter the Target to
cmd /c start /BelowNormal Poser.exe
(or PoserPro.exe, or Queuemanager.exe whichever I want to adjust) - I save with [OK]
From now on, every time I use that Poser Low Prio shortcut, my application is launched with the BelowNormal priority, and so will the FFRender when launched from Poser as a Separate Process. When I want to run in Normal priority, I just use the other shortcut and eventually adjust at runtime using TaskManager as described above.
However, when I launch Poser by double clicking a pz3 file instead, I’ll still get Poser in Normal Priority.
So I want to change that too! Not too difficult, but do note that we are descending to the deeper parts of the Windows OS.
- Step 1: I create a batch file (say RunPoser.bat) which does the launch job
- Actually, I create a txt file with the lines
C:

cd "\Program Files\Smith Micro\Poser Pro 2010"

cmd /c start /belownormal PoserPro.exe %1 - The first line will put me to my system drive, the second puts me in the path to the Poser executable (this will be different for the various Poser versions, yours may well read “…\Poser 9” or “…\Poser Pro 2012”. !! Note the quotes to handle spaces in the folder names properly. !! Also note that I have to adjust this .bat file after upgrading to another Poser version. The third line starts Poser, in your case it might read … Poser.exe …. Do not put quotes around the %1 here!
- Now I save and rename the text file to RunPoser.bat (first I made sure I can see known extensions, it should not remain a text file!)
- I put the RunPoser.bat in a convenient place (as in my C:\ root folder)
- Step 2: I assign this batch command to the pz3 file extension
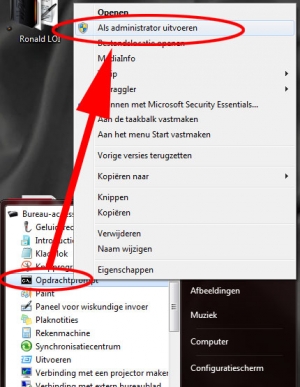
- I open programs, desktop tools / accessories,
right-click the Command option and run as administrator - this opens the CMD textual command box (good old MS-DOS like). Now I type ASSOC .pz3 (don’t forget the ‘.’ period before the pz3) and it answers with some association string (the internal file type, here: PoserProSceneAsciiFile). Now I type FTYPE <the internal type> and it answers <internal type>=<path>Poser.exe or in this example: <path>PoserPro.exe. I recommend to write that down somewhere, you’ll never know. It tells me that files of that type are opened with the Poser command, the “%1” at the end feeds it the pz3 file itself. The quotes are needed to ensure a proper handling of the spaces in the folder names.
- Now I enter ftype <internal type>=c:\runposer.bat “%1” Of course, when you’ve chosen different names and places, use those.
- I type exit to quit the command box
Now, when I double click a pz3 file, it opens Poser in the Below Normal priority.
As an extra: when I work with compressed .pzz files, I’ve got to repeat all this. These files are known as PoserProSceneBinaryFile, and so:
Notes:
- according to some people on the Internet there is a way to get this done without the batch file, but I could not get it to work properly. Either it did not pick up the Poser starting folder, or it did launch just in Normal priority.
- I do need admin rights to (re)set/write the FTYPE value as in the last step, but not to get/read it as in the first steps. I can always set it back to its original value.
- I have to re-check those settings after upgrading to a new Poser version. The examples above are from Poser Pro 2010, but after installing Poser Pro 2012 I noticed that the associations had changed:
- .pz3 => PoserSceneAsciiFile – without the Pro in the string
- .pzz => PoserSceneBinaryFile – ditto
- And indeed, after installing a Service Pack upgrade (I just installed Poser Pro 2012 SP2 over my existing Poser Pro 2012), I has to redo the .pzz and .pz3 file handling. And eventually, also the other Poser settings (external Libraries included) unless the “use existing files” is selected at the Service Pack installation.
