Rendering strategies
So, up till now I’ve discussed the technical side: how to get the program up and running properly. In the next chapters, I’ll discuss ways to use the program efficiently, regarding the way Poser fits into the entire workflow.
Generally, when I click the Render button, Poser will run the renderer as an internal process. I can watch the progress in the Render pane, and I’ll have to wait till it’s finished. One of the disadvantages is that the render process caries all the load (or: the memory usage) of the design process as well. On 32bit environments (Poser and/or OS), this might bring the program over the cliff when the rendering requires more memory than can be presented. The limit is 2Gb for Poser on 32bit Windows, or up to 3Gb for Poser on Mac, Poser on 32bit Windows with special measures, or 32bit Poser on a 64bit system. See the RAM Usage chapter and eventually my Breaking the 2Gb Barrier tutorial on handling all this.
One solution is to check the Separate Process option in the General Setting, which will run the renderer as an external process, explicitly present (as FFRender.exe) in Task Manager. This will free the rendering from the design overhead, and enables fuller or more detailed scenes to be rendered. But I still have to wait till the process is finished.
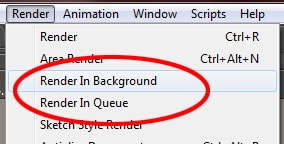
The second solution is to use Render in Background from the Render menu. As can be expected, I now can continue my design work while rendering simultaneously.
This option is not available in Poser, it’s Poser Pro only.
Note 1: while rendering in the background, I cannot start a second render process, say for testing a scene. I can do design only.
Note 2: when I experience user interface issues while rendering in background, like nasty mouse behavior, I can improve on that by running Poser itself in Below Normal priority mode as explained in the CPU Usage chapter. This will also launch the background processes in the same Below Normal priority, giving me a smooth user interface behavior.
The third solution is to Render in Queue, again: not in Poser, it’s Poser Pro only. Actually this will launch the Poser Queue Manager which in turn will render the scene. Since this is a process on its own, I can continue designing as well as rendering in Poser.
Note: whether I Render in Background or Render in Queue can be set in the Render Settings too:
Queue Manager and Priority
Note: Queue Manager is Poser Pro only, sorry for that.
Queue Manager comes in two parts: the working process and the user interface to view and manage all this. When Poser runs Render in Background, it actually launches the QM working process (when it’s not active already), feeds it the scene, continues the design process while the rendering produces its result, and finally reels the result back in. The working process isn’t killed until my system terminates. When Poser runs Render in Queue it launches the working process as well as the user interface to it, or when the working process is already active, it launches the user interface only. Then Poser feeds the scene to the working process, and continues. When I stop the QM (after handling all jobs in the queue), I will only kill the user interface as the working process stays alive till my system is terminated.
I can also launch the QM from the shortcut that comes at installation. This also launches the working process as well as the user interface, and when the working process is already active (from an earlier launch from Poser), it launches the user interface only. And again, when I stop the QM (after handling the queue), I will only kill the user interface as the working process stays alive till my system is terminated.
Why does this matter? Well, when the working process is launched from Poser, it takes the priority of the Poser process. When Poser runs at Below Normal, then so will Queue Manager, and so will the rendering launched from it. It gives me decent mouse behavior but Poser itself will run at the same priority as the rendering, and Posers performance and responsiveness will suffer.
This can be solved by launching Queue Manager from the shortcut, before I ask Poser to perform any Background or Queue render, and ensure that the shortcut launch results in a priority even below Posers. And when Poser runs in Below Normal mode, Queue Manager should be launched as Low.
So, I changed the shortcut target to : cmd /c start /Low QueueManager.exe
Queue Manager and Networking
When Queue Manager is active on several machines within the same network, then each one which has got assigned specific jobs from the Poser on that machine will try to share its load with other instances. Even the simple case of one Poser user launching render jobs into the Queue requires QM to be started before that on other machines that take part in the rendering process. This for instance can be part of the machine boot cycle (just put the shortcut in the startup folder). When such a QM instance is launched at BelowNormal or Low priority, changes are that any user on that machine won’t notice its additional use. This way even the full CPU power of the whole office can be utilized. Additional instances of Poser on other machines then can take part in the party: they only have to join in.
Do note that QM takes the render of each separate frame as a (part of a) queued job running FireFly. QM cannot render in Toon or Sketch mode, and animations should render to image files and not to some movie format. I need a movie editor to combine the frames to one movie file. And to make it really work: all machines should have the same address for output, like X:\mymovie\… This by the way is the way professionals and studios work: assembling the movie file is one of the very last steps in the process.
Each frame then can be handled in a separate machine, but various machines cannot work on parts of the same image. This is the opposite of the rendering in one machine; all threads render parts of the same image but all render the same frame at the same time.
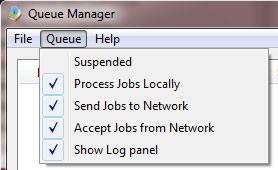
The Queue manager interface offers a few options:
- File \ Quit – quits the user interface but leaves the working process alive. Just re-launch QM from the shortcut again to get the GUI back.
- File \ Exit – quits the user interface as well as the working process
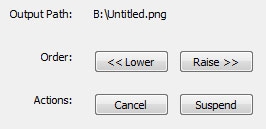
- Queue \ Suspend – pauses all running and unfinished jobs. I can also suspend or cancel a single selected job, using the Selected Job options below the job list panel. I can also reorder the (waiting) jobs.
- Queue \ Process Locally – meaningful in a Network setup only. Checking OFF frees the Poser machine for design and test-rendering while using the other machines for handling the queue, in other words: the Local QM acts as client / manager only while the other machines act as server / worker. When ON, also the Poser machine itself takes part in the work and the Local QM acts as client/server or: manager/(co)worker. And of course when the Poser machine is the only one alive, it’d better be ON to get any work done at all. I guess the renderer will finish its current frame but will not pick up anew, when I check off. It will not stop halfway.
- Queue \ Send Jobs to Network enables (when: ON) client / managers to utilize the network rendering features. Servers / workers do not send jobs around. One reason to switch this OFF is when I want the QM on my machine to process jobs as a nifty background processor, without loading other network nodes. When the Poser machine is the only one alive (no rendering network), this option is meaningless. Again, I guess that QM will finish its current frames but will not send out a new, when I check off. It will not stop halfway.
- Queue \ Accept Jobs from Network enables the server / worker role from Poser rendering requests from other machines. Of course this should be enabled (ON) for non-Poser machines as otherwise they don’t take part in the rendering network. This option differs from the previous Process Jobs Locally as the latter concerns jobs from the Poser on the same machine. When the Poser machine is the only one alive, this option is meaningless. Here too, I guess the renderer will finish its current frame but will not accept anew, when I check off. It will not stop halfway.
- The Log-panel is the third part of the user interface, I can show or hide it. Anyway, QM creates a log in the users Temp environment, and resets it at any new launch of the working process.
Rendering in the cloud
So I can run Queue Manager on the same computer as I’m running Poser. And I can use Queue Manager to render out to another machine, if available. Buying a second machine just for rendering proves hardly to be cost-effective, especially for hobbyists and artists on a budget. But what about renting one by the hour?
This is made possible by “Rendering in the Cloud”, just paying for machine cycles by the hour after I’ve setup my Poser Queue Manager out there as I would have done otherwise.
But be aware, and sort out price/performance issues first. Some websites are already publishing benchmarking figures and price comparisons. At the moment of writing this (March 2012), a service comparable to my own machine costs:
- $2,60/hour at GoGrid, 8Gb ram
- $2,00/hour at Amazon AWS, 7Gb ram (http://aws.amazon.com/ec2/)
- $1,60/hour at Rackspace, 8Gb ram
- $1,60/hour at Voxel (Europe), 14Gb ram
- $1,50/hour at Storm Cloud, 48Gb ram (http://www.stormondemand.com/)
- $0,50/hour at Storm Cloud, 8Gb ram
But this does not mean Windows is always available as a service. At the moment Amazon has, Storm has not. It also does not mean that the accompanying disk storage comes for free – usually it’s a fixed subscription fee from $20 to $200 per month. But it does mean that there are alternatives for boosting my rendering abilities, and it suggests that things might change a lot in the next few years.
At Renderosity.com some forum threads can be found on setting up such a cloud-rendering configuration. Issues people are facing are:
- setting up the networking details such that Poser (on the local box) communicates with the Queue Manager (on the remote site). This is far from trivial, the details are in virtual LANs, firewall rules and ports to open. I won’t go into details here as things might evolve rapidly. When you’re up to it, consult the forums.
- handling the network load. A serious scene including all meshes and image maps might take 200Mbytes = 2000Mbits which hence requires 2000 sec (=35 min) to upload over a relatively fast 1Mbps upload link. So if the render itself takes 20 mins, this setup renders 1 image per hour (35 min upload, 20 min render, 5 min download). This seriously cripples the overall machine performance.
Summary
Bringing it all together:
- One off: When on a 32bit Windows; enable the 3Gb-switch
- In Poser, enable rendering as a separate process
-
For Poser Pro:
- Launch Queue Manager first, at Low priority. Do so on all machines in the rendering network. Then launch Poser, at BelowNormal priority
- Send all (semi)final large scale renders, animation sequences and time consuming IDL renders to the queue. Now one can even pause the rendering when it’s hampering test-renders, the design workflow or anything else. And one can re-order jobs to get specific results earlier.
- Note that you don’t have to own all rendering power yourself. Renting by the hour becomes an option, in due time, at least for intense rendering bursts during a short period.


