Gamma Correction
Imagine, you shoot a picture with your camera, load it into your PC and – perhaps even as part of your routine, you adjust the whitepoint, the blackpoint and the greypoint. In Photoshop Levels Adjustment or Curves Adjustment there are even straightforward colorpickers to do so. This image can be used for a texture in your 3D program, like Poser of Vue.
Alternatively, you paint a texture image and use the colorpicker values or colorwheel settings to get the right colors. RGB (63,0,0) or HSV (0,100%,25%) for instance might give you the proper dark red.
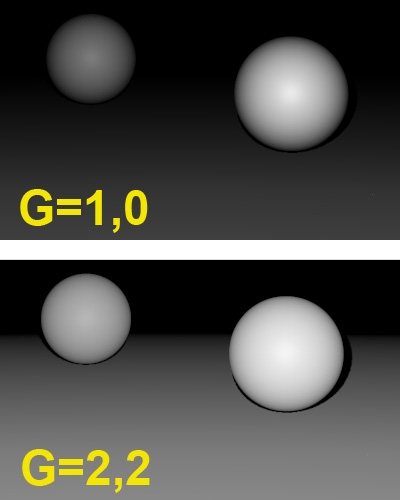
Now you just view it directly, or view the result your render created with this texture, or send any of it to print. Bets are that you will find the result rather overly dark, especially in the shadowy or low-brightness spots but in the midtones too. This is due to your monitor, which for various technical and historical reasons has an embedded brightness distortion known as the “gamma effect”. Nowadays, almost all displaying and printing equipment shows this distortion in a standardized way. This standard is known as sRGB.
The compensation for this effect is known as “Gamma Correction”. When applied to an image, it especially brightens the darks a lot and the midtones a bit too, and you get the image displayed or printed as it was intended. In order to get the correction out of the image, “Anti Gamma Correction” has to be applied. Actually, this is what your monitor does when displaying. The actual value (gamma) for modern equipment is: 2.2. The neutral – do-nothing – value is 1.
To Gamma or to Expose
When you are concerned about the brights in your image, you want to handle the risk of over-lighting, or you want to emulate natural film response, then Exposure Correction is the proper tool.
When you are concerned about the darks in your image, and want to handle the risk of losing detail and getting overly hard shadows, and/or you want to export the image with a minimum loss of detail, then Gamma Correction is the best pick. That is: when it’s available in the software. And of course you can do a bit of both.
In practice, Gamma Correction is not always available, and when it is, it comes with a stack of side effects. These will be discussed in later chapters in this article. But as discussed in an earlier chapter (Do I Need Corrections), not correcting has its drawbacks as well. Your image, your call.
Engineering stuff
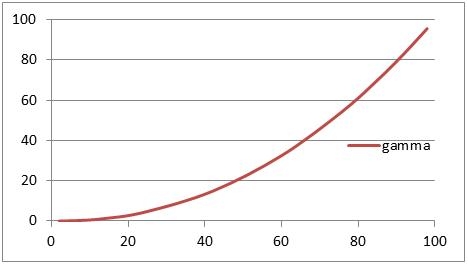
For those who like formulas and curves, the formula for the gamma effect (the behavior of your monitor), and hence for the Anti Gamma Correction, simply reads
After correction = (Before correction) Gamma
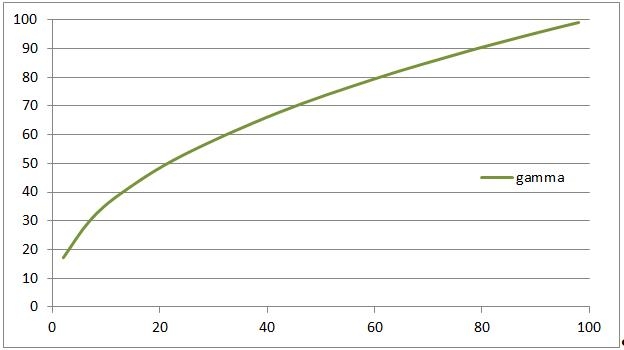
And since the neutral – do-nothing – value equals 1, the inverse or Gamma Correction (right image) itself reads
After correction = (Before correction) 1 / Gamma
Formally the sRGB standard which your monitor is supposed to adhere to is slightly different, and especially a bit less aggressive in the very darks. But gamma = 2.2 is a good approximation, and a pure sRGB correction is not available within the software anyway.
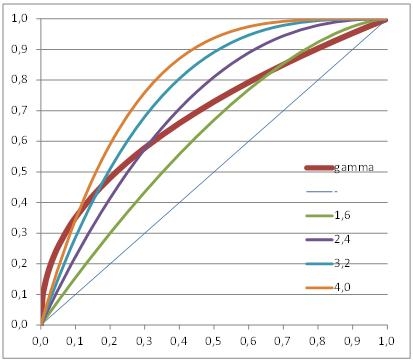
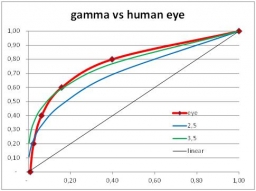
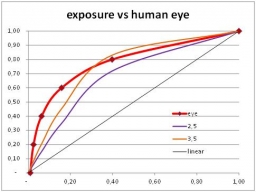
Graphs are a handy way to show the differences between Gamma Correction (set to 2.2) and Exposure Correction (various values).
Exposure Correction (compared to Gamma Correction)
As you can see, the Exposure Correction using 1.6 (Poser very bright part of the image. And Gamma Correction wins from every meaningful Exposure Correction when applied upon the darkest details of the image.
Gamma / Exposure Correction and the Human Eye
The ‘monitor’ which was not discussed yet, is the human eye. Our eye is a dynamic device, which adapts in various ways when looking to dark or bright areas. Varying pupil width is one way, but the light receptors and the signal processing in our brain have some more tools in reserve. Let’s concentrate on scene brightness.
From astronomy, star brightness is divided in classes or magnitudes. This was introduced by the ancient Greek (Hipparchus, 120BC), and refined when Norman Pogson stated that a “first magnitude” star is 100 times as bright as a “sixth magnitude” one. This implies that
Brightness = (2,512) Magnitude
give or take some constants, as 2.512 (6-1) = 100. Now, let’s compare the eye with Gamma or Exposure Correction.
Just from the graphs (next page) we’ll find that Gamma curves (left) are far more comparable to the human eye behavior than exposure curves (right). Why does it matter? Well, when we look into a real scene our pupils adjust when we focus on specific areas. Usually the darker areas are farther away than the bright ones. But when we look at an image of that scene, on display or paper, the dark and bright areas are at the same distance. Focusing will be much harder, and our pupils will not, or far less, respond to brightness differences. Therefore, our eyes appreciate some help.
And as we can see from the graphs, and can experience by experimenting, Exposure Correction is a decent step forward compared to nothing (linear), but Gamma Correction is by far superior as it is more helpful in the darks.
From psychology, or better: from our evolution, humans are more curious about (or afraid for) the darks. This determines the workings of our brain. Each step in brightness magnitude should offer equal amounts of detail, for a comfortable feeling. In other words: overshooting the darks is less troublesome than undershooting, and vice versa for the brights.
This is why gamma correction is more pleasing than exposure correction. See the gamma=3,5 curve (left graph, green line) which offers a minor overshoot in the darks as well as a minor undershoot in the brights. This is what we appreciate. We feel more comfortable with it.
The exposure=3,5 curve (right graph, orange line) on the contrary shows a mild overshoot in the brights against a serious undershoot in the darks. This is what we like less. Exposure corrected imaged show more resemblance to a photograph, as it mimics film behavior. Gamma correction helps the eye and gives a more comfortable feeling. Your image, your call.
